Sorting out the transmission
angles
Adding a transmission tunnel and raising the prop shaft has done wonders
for the ground clearance but it has severely affected the prop shaft angles.
To sort this out both the engine and the back axle will have to be relocated.
Thius is turing into a fairly major modification.
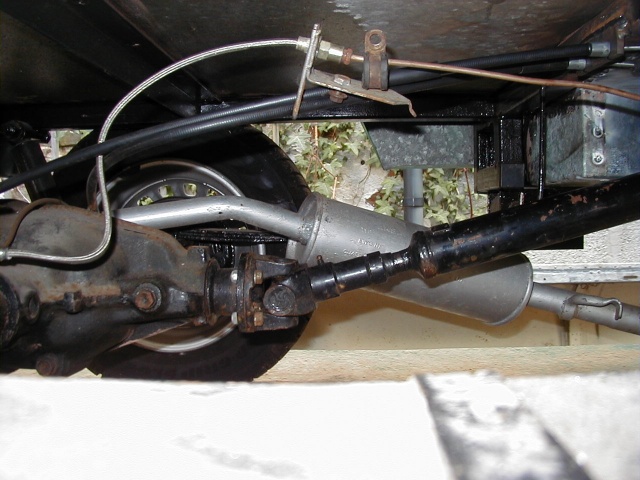
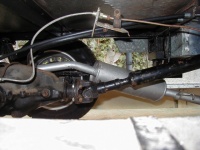
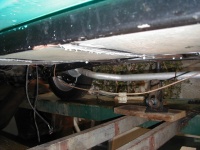
 As the prop is a lot higher than it was originally the engine will have to
be tilted forwards to reduce the angle on the engine CV joint. The rear gearbox
mount can be raised quite a bit but the front mounts will also have to be relocated
as the gearchange linkages foul the steering rack. First job is to cut off all
of the mounts and start again.
As the prop is a lot higher than it was originally the engine will have to
be tilted forwards to reduce the angle on the engine CV joint. The rear gearbox
mount can be raised quite a bit but the front mounts will also have to be relocated
as the gearchange linkages foul the steering rack. First job is to cut off all
of the mounts and start again.
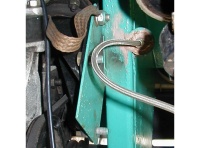 This
is the original front engine mount. It is simply a piece of 3mm plate held on
with three small welds. This car is amazing. Some parts of it are unbelievebly
overbuilt and others are dangerously weak. I wonder how many of these cars had
the mount fail. Mind you, it made life easier for me as it took no time to remove...
This
is the original front engine mount. It is simply a piece of 3mm plate held on
with three small welds. This car is amazing. Some parts of it are unbelievebly
overbuilt and others are dangerously weak. I wonder how many of these cars had
the mount fail. Mind you, it made life easier for me as it took no time to remove...
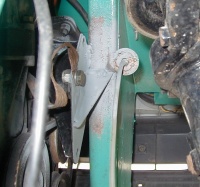
 Just
above the engine mount we go to the other extreme. This amazing construction
is the front shock mount. I know the front suspension takes some fairly heavy
loads but do you really need to take a piece of large diameter 6mm thick steel
pipe then wrap it in 40mm square, 3mm wall box section?? It would survive a
nuclear bomb blast with minor bubbling of the paint. To put this into context
the front suspension on the Locost
attaches to 25mm square 1.5mm wall steel box. There is a Locost racing
series and in an impact the suspension wishbones usually fail, not the mounts.
Just
above the engine mount we go to the other extreme. This amazing construction
is the front shock mount. I know the front suspension takes some fairly heavy
loads but do you really need to take a piece of large diameter 6mm thick steel
pipe then wrap it in 40mm square, 3mm wall box section?? It would survive a
nuclear bomb blast with minor bubbling of the paint. To put this into context
the front suspension on the Locost
attaches to 25mm square 1.5mm wall steel box. There is a Locost racing
series and in an impact the suspension wishbones usually fail, not the mounts.
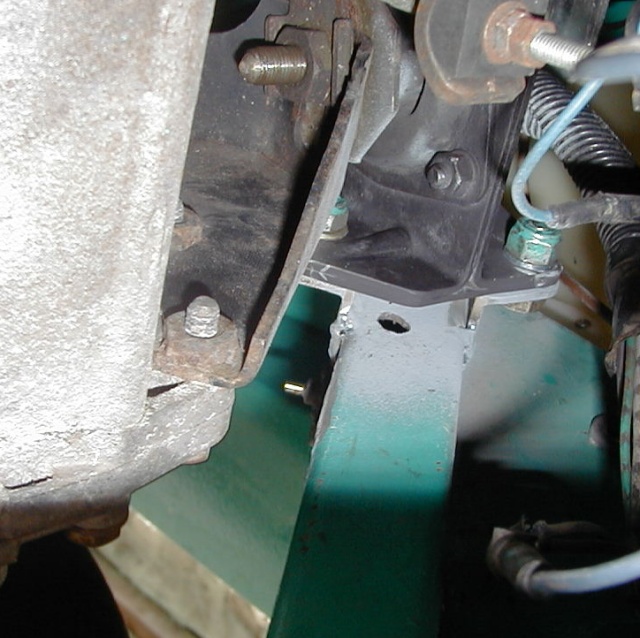
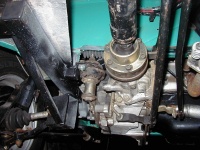
 This
is the new, repositioned engine mount. It is still made out of 3mm plate
but it now has a reinforcing gusset which greatly adds to the strength. Actually
this is the Mk2 bracket. I had the Mk1 bracket and rear gearbox mount in place
when Rick (default_user on the Fiat Forum)
warned me to check the front driveshaft clearances. It is a good thing he did
because they were way out and could have resulted in some nasty damage to the
shafts and gearbox. Rick is rebuilding an NCF Road Rat (dubbed Satan's Rodent),
the predecessor to the Torino. You can see his site here.
This
is the new, repositioned engine mount. It is still made out of 3mm plate
but it now has a reinforcing gusset which greatly adds to the strength. Actually
this is the Mk2 bracket. I had the Mk1 bracket and rear gearbox mount in place
when Rick (default_user on the Fiat Forum)
warned me to check the front driveshaft clearances. It is a good thing he did
because they were way out and could have resulted in some nasty damage to the
shafts and gearbox. Rick is rebuilding an NCF Road Rat (dubbed Satan's Rodent),
the predecessor to the Torino. You can see his site here.
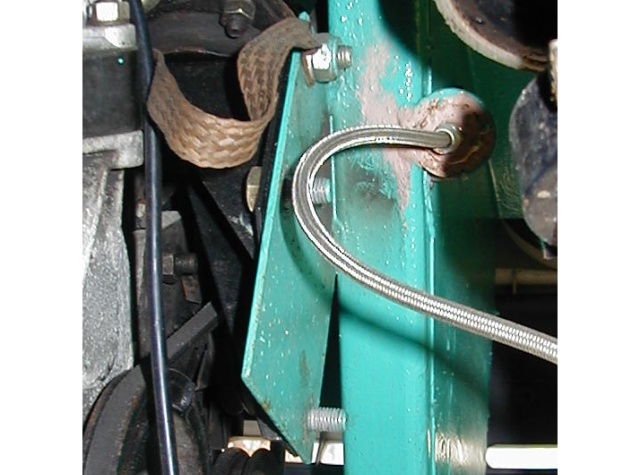
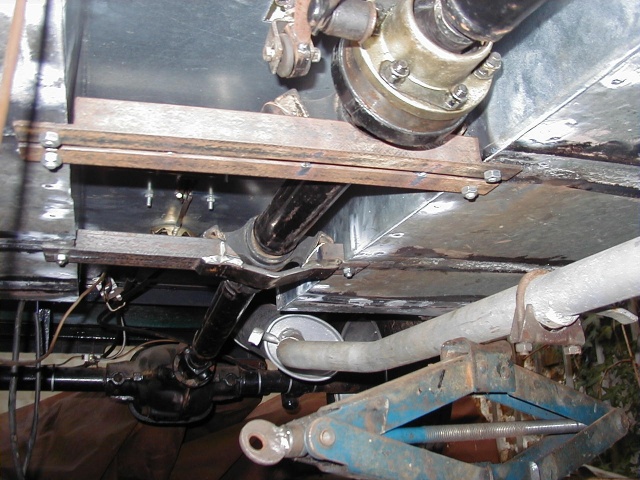
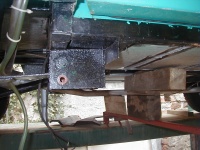
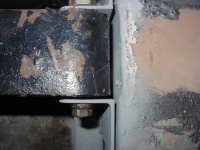
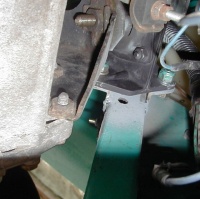 This
is the front gearbox mount. It is made from two pieces of angle welded to the
chassis. Simple and strong. The hole in the chassis rail is part of the original
mount. As in many other places the bolt goes straight through the box section.
The box should have a reinforcing tube to stop it collapsing when the bolt is
tightened. Without this it is impossible to tighten up the bolt properly. The
front suspension tie bars are bolted on in the same way. I will be fitting crush
tubes in them.
This
is the front gearbox mount. It is made from two pieces of angle welded to the
chassis. Simple and strong. The hole in the chassis rail is part of the original
mount. As in many other places the bolt goes straight through the box section.
The box should have a reinforcing tube to stop it collapsing when the bolt is
tightened. Without this it is impossible to tighten up the bolt properly. The
front suspension tie bars are bolted on in the same way. I will be fitting crush
tubes in them.
 This
is the gearbox rear mount bracket. The original bracket placed the mount below
the chassis rail, this one places it above the chassis rail.
This
is the gearbox rear mount bracket. The original bracket placed the mount below
the chassis rail, this one places it above the chassis rail.
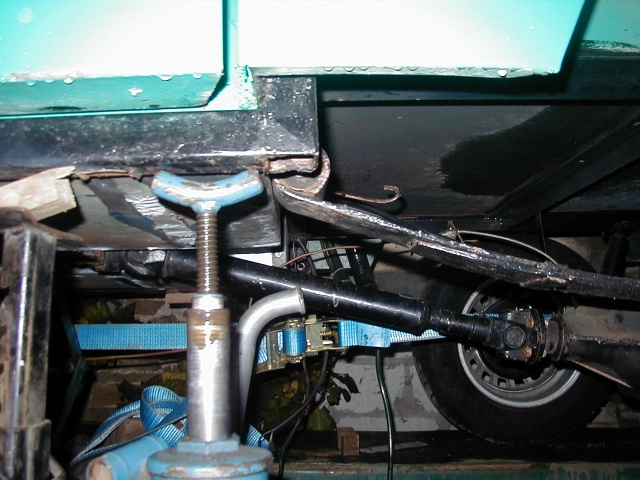
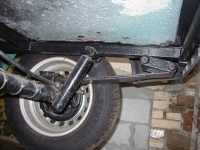
 The
rear prop shaft angle was so bad that the diff joint jammed solid before
I could raise the prop into the correct position.
The
rear prop shaft angle was so bad that the diff joint jammed solid before
I could raise the prop into the correct position.
 As
the front leaf spring mount was very low, my first idea was to simply
redrill the holes as high as they would go. This was nowhere near enough
so more drastic action was required.
As
the front leaf spring mount was very low, my first idea was to simply
redrill the holes as high as they would go. This was nowhere near enough
so more drastic action was required.
 All
of the original spring mount bracketry was cut off so the spring could
sit just behing the seat well. This raised the spring mount something like 100mm
above it's previous position. Cutting off the bracketry was interesting. The
previous owner filled all of the box section with Waxoyl to stop rust. Mix Waxoyl
and a plasma cutter and you get... a flame thrower! I couldn't see all of the
flames but apparently at one point while I was cutting off the left hand mount,
flames could be seen coming out the right hand wheel well! You will probably
be reieved to hear I had a couple of fire extinguishers handy and someone
to watch for fires.
All
of the original spring mount bracketry was cut off so the spring could
sit just behing the seat well. This raised the spring mount something like 100mm
above it's previous position. Cutting off the bracketry was interesting. The
previous owner filled all of the box section with Waxoyl to stop rust. Mix Waxoyl
and a plasma cutter and you get... a flame thrower! I couldn't see all of the
flames but apparently at one point while I was cutting off the left hand mount,
flames could be seen coming out the right hand wheel well! You will probably
be reieved to hear I had a couple of fire extinguishers handy and someone
to watch for fires.
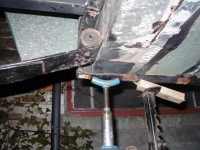
 With
the axle roughly in position I needed to make the centre bearing mounts so I
could finalise the exact position of the axle. Although these brackets don't
look much they took about a day each to make. To improve the angles, the centre
prop is angled down a bit. This allows me to angle the front of the diff up
and further reduce the joint angles. Due to the way that universal joints work
it is important that the diff flange and the centre prop are parallel. If they
are not parallel there will be a lot of prop shaft vibration. The centre prop
is not parallel with the gearbox, which is why Fiat used CV joints for the front.
With
the axle roughly in position I needed to make the centre bearing mounts so I
could finalise the exact position of the axle. Although these brackets don't
look much they took about a day each to make. To improve the angles, the centre
prop is angled down a bit. This allows me to angle the front of the diff up
and further reduce the joint angles. Due to the way that universal joints work
it is important that the diff flange and the centre prop are parallel. If they
are not parallel there will be a lot of prop shaft vibration. The centre prop
is not parallel with the gearbox, which is why Fiat used CV joints for the front.
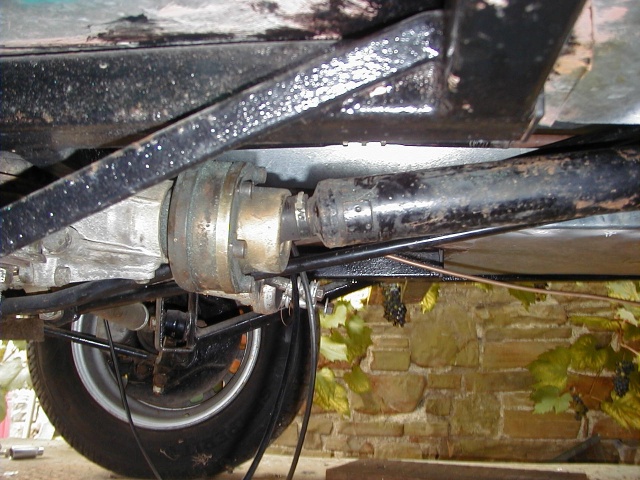
 Although
the prop angle doesn't look much different in this pic it is actually much better.
I have fitted wedges between the axle and springs to tip the front of the diff
upwards which helps. The lighter grey marks on the floor above the axle are
actually soot from the flamethrower episode. Before welding in the new brackets
I checked the wheel alignment and was horrified to find the wheels were 10mm
closer together on the left hand side. On further investigation it appears the
left hand front wheel is 10mm further back than the right hand wheel. This is
probably not a problem but it still seems an awful lot to me. I need to play
around with the front suspension geometry so at the same time I will see if
I can move the wheel forwards.
Although
the prop angle doesn't look much different in this pic it is actually much better.
I have fitted wedges between the axle and springs to tip the front of the diff
upwards which helps. The lighter grey marks on the floor above the axle are
actually soot from the flamethrower episode. Before welding in the new brackets
I checked the wheel alignment and was horrified to find the wheels were 10mm
closer together on the left hand side. On further investigation it appears the
left hand front wheel is 10mm further back than the right hand wheel. This is
probably not a problem but it still seems an awful lot to me. I need to play
around with the front suspension geometry so at the same time I will see if
I can move the wheel forwards.
 The
new spring mounts are welded in place and sprayed with cold galvanizing
paint. This is about the best primer I have found for preventing rust. It tends
to chip fairly easily but this area will be well protected with plenty of underseal.
I will be adding a brace going up to the chassis rail directly above the spring
but I started running out of light and it had started raining (again).
The
new spring mounts are welded in place and sprayed with cold galvanizing
paint. This is about the best primer I have found for preventing rust. It tends
to chip fairly easily but this area will be well protected with plenty of underseal.
I will be adding a brace going up to the chassis rail directly above the spring
but I started running out of light and it had started raining (again).
 The
prop shaft length defines the position of the back axle. Unfortunately this
means that the spring ends up hard against the step in the floor. Obviously
this is a problem as the spring needs to move. I had a choice - cut out a section
and weld in a box or beat the cr*p out of it with a large hammer. As you can
see the large hammer option won. It looks a bit rough but once it is undersealed
it will look a lot better. Once the seats are in you won't be able to see it
inside.
The
prop shaft length defines the position of the back axle. Unfortunately this
means that the spring ends up hard against the step in the floor. Obviously
this is a problem as the spring needs to move. I had a choice - cut out a section
and weld in a box or beat the cr*p out of it with a large hammer. As you can
see the large hammer option won. It looks a bit rough but once it is undersealed
it will look a lot better. Once the seats are in you won't be able to see it
inside.
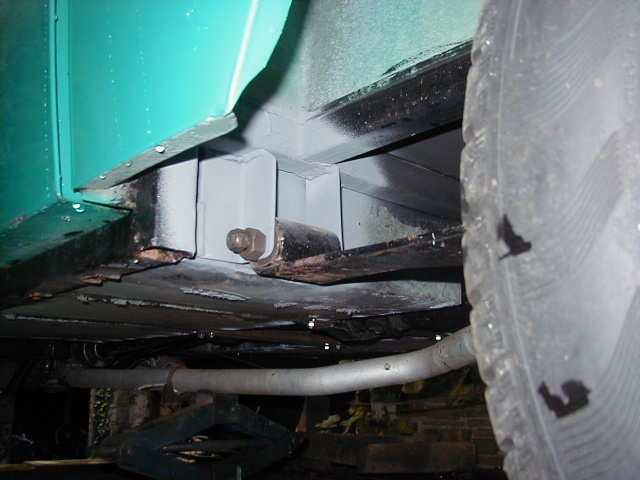
 Another
view of the underside. As you can see the car is now nearly flat underneath.
It is a major improvement from when I started. The exhaust will of course be
relocated as well.
Another
view of the underside. As you can see the car is now nearly flat underneath.
It is a major improvement from when I started. The exhaust will of course be
relocated as well.
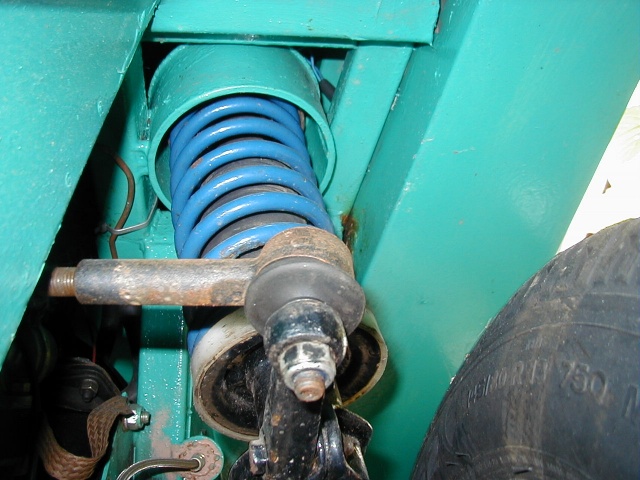
 Relocating
the front mounts upwards and backwards has had a disastrous effect on the
ride height and rear shackle geometry. As you can see the rear shocks are almost
fully compressed and the shackles are nearly hitting the chassis. The car is
currently sitting about 75mm lower at the back than it did when I started. To
a certain extent, lowering the ride height is good because it lowers the centre
of gravity. As I removed so much junk from under the floor, ground clearance
is still considerably better than it was when I started. Moving the shackle
mounts backwards and downwards will restore the correct geometry and increase
the ride height a bit. More importantly it will increase the clearance between
the axle and chassis. The shock mounts will have to be relocated above
the chassis rail. This will result in two bumps in the floor but I can't see
any other solution to the problem.
Relocating
the front mounts upwards and backwards has had a disastrous effect on the
ride height and rear shackle geometry. As you can see the rear shocks are almost
fully compressed and the shackles are nearly hitting the chassis. The car is
currently sitting about 75mm lower at the back than it did when I started. To
a certain extent, lowering the ride height is good because it lowers the centre
of gravity. As I removed so much junk from under the floor, ground clearance
is still considerably better than it was when I started. Moving the shackle
mounts backwards and downwards will restore the correct geometry and increase
the ride height a bit. More importantly it will increase the clearance between
the axle and chassis. The shock mounts will have to be relocated above
the chassis rail. This will result in two bumps in the floor but I can't see
any other solution to the problem.
Back to Torino index
 As the prop is a lot higher than it was originally the engine will have to
be tilted forwards to reduce the angle on the engine CV joint. The rear gearbox
mount can be raised quite a bit but the front mounts will also have to be relocated
as the gearchange linkages foul the steering rack. First job is to cut off all
of the mounts and start again.
As the prop is a lot higher than it was originally the engine will have to
be tilted forwards to reduce the angle on the engine CV joint. The rear gearbox
mount can be raised quite a bit but the front mounts will also have to be relocated
as the gearchange linkages foul the steering rack. First job is to cut off all
of the mounts and start again.